Categorically Modern

home projects, ponderings and happenings in beacon hill seattle.
Showing posts with label diy. Show all posts

Saturday, October 29, 2011

Redo! : Another take at our fence

After you build and design something you then realize that things could be better.  They could always be better, right?  Well in this case, it can definitely be made better. 

I realized how difficult it was to move from our front of the house to the private backyard with no entrance planned.  I knew this would be an issue, but since I didn't have the know how on creating a door, using hinges, or anything like this I just skipped the thought of a door. Who needs a door?  We have a back door to the yard but we access that from the other side of the house. Problem was, that since all the heavy gardening thus far has been in the back yard, everytime I brought a haul of dirt, compost or plants home it had to be thrown over the 8' tall fence. Not good on the back let me tell ya.


Back to the drawing board. This time I took a few weeks to think it out and sketch some ideas, then it came to me; a dry day anyway.  I took a stab at a rough sketch and then just jumped into it.

If you don't remember here is the first fence that we were left from the previous owners. Boring, and cut the possible yard in two.  Ick.

 And here was the revision in process and the final look completed this past spring.

This was when I still was trying to reuse the old wood, not such a cohesive look.

The way it looked this past spring.

Gotta love the planters!  

And all done.  Not bad.  Covered the old driveway at least.

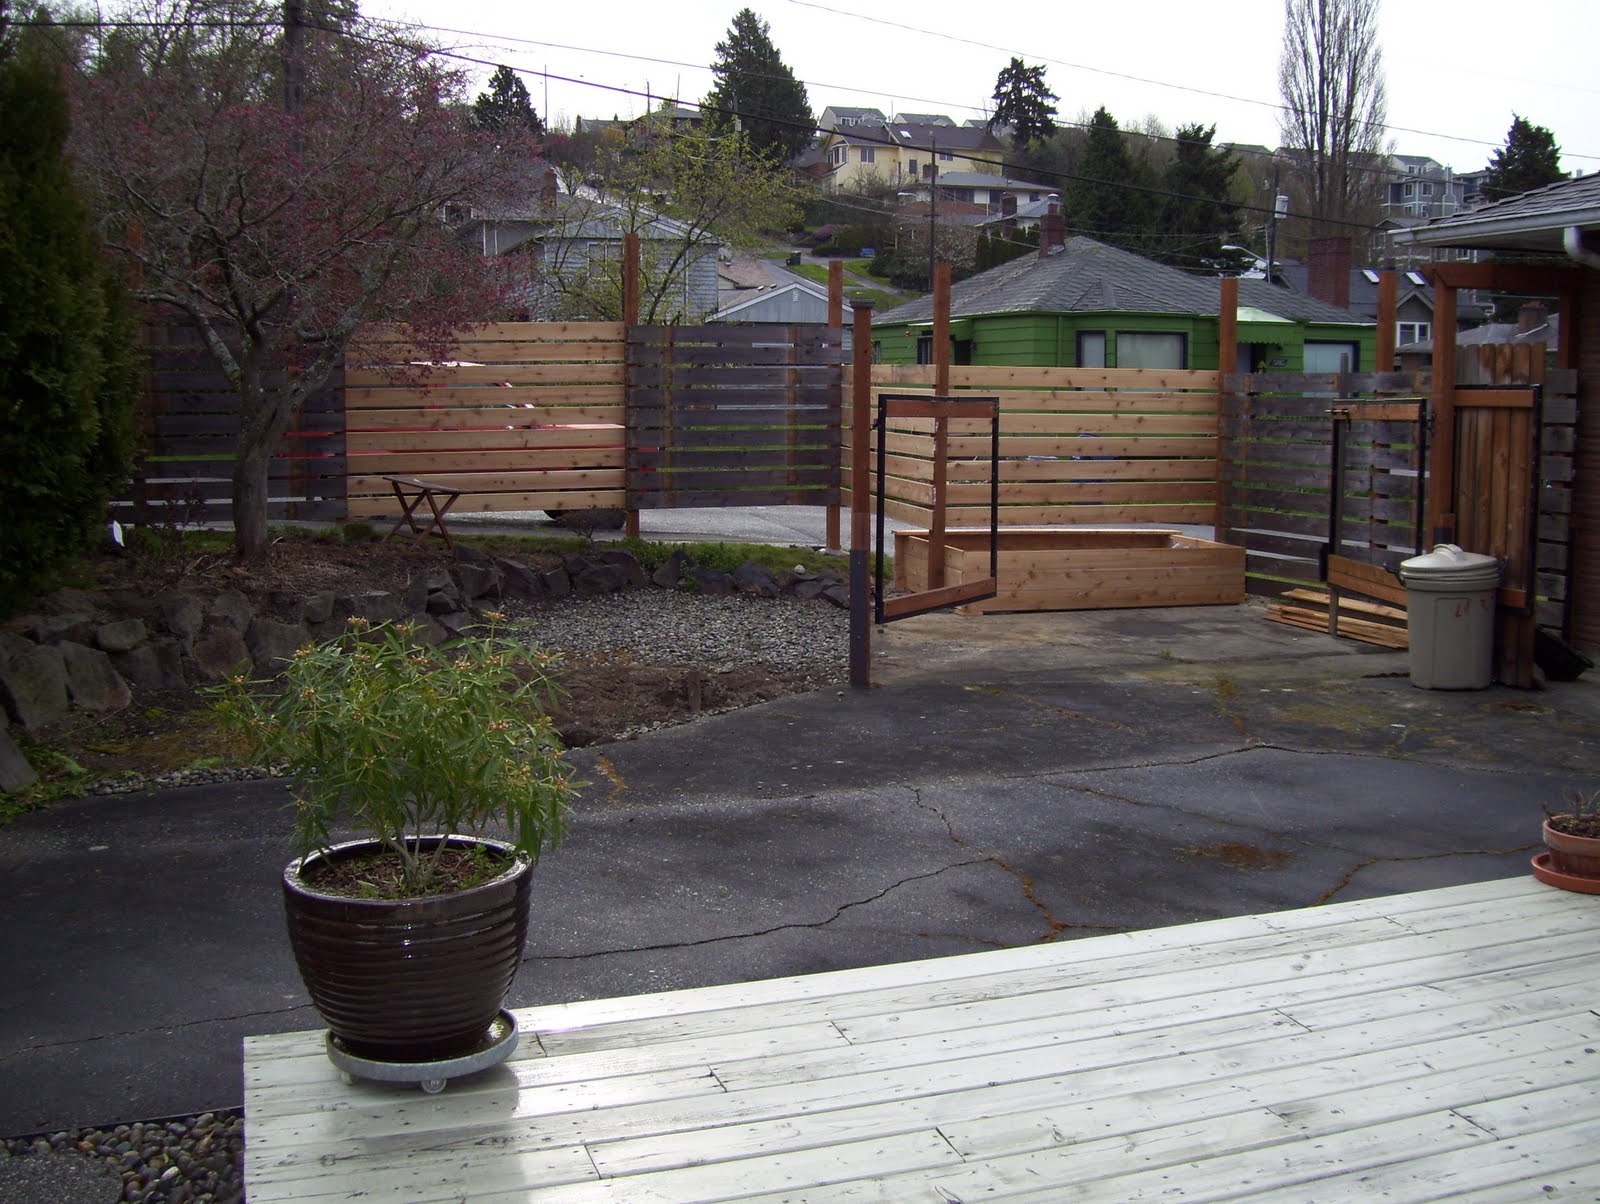
So here is the new pass through.  At the point I took this picture, I actually only had reused the old wood from the fence and planters I had already constructed.  Not to shabby on reduce, reuse and recycle, eh?  Here I was beginning to contemplate the door.  God, how was I going to make a door on (1) uneven ground (2) with functioning hinges (3) a lock and (4) didn't look all Janklers (i.e, all ugly....thanks for expanding my vocabulary Casey!)


Somehow I did it. Without using too many trees, I made a door that if you notice is quite even at the top, and at the bottom, despite the concrete sloping southbound (to the left of the picture). Plus, all my plants that were in one planter are now nicely spread between two!  Life is so much better. Now, of course, this leads me to the next few projects this fall. Retaining wall in the back yard to extend our grassy play area as well as to allow a better planting space for our shade loving plants like Rhubarb and lettuce; building new planters in the back yard for next years killer Tomatoes; and of course the best project of them all....our nursery!  It has been a year in the making but finally we are on the adoption list and ready for a munchkin. We are spending tomorrow afternoon slapping some paint up and getting the room ready.  More about that later.  I will leave you with a picture of this past years Tomatoes! This is one load of many.  Next year will be the year of the Marinara and Salsa!

Friday, September 30, 2011

Shut the Front Door


So my mom and sister were on the way for a visit and I had a few minutes to do some extra cleaning around the house for their first visit.  What to do?  I had recently been thinking about the front door, so why not lightly sand the door and add some oil to make it look nice and rich!(after all I now have an orbital sander since I had to do the kitchen cabinets)  The 60 year old door didn't look that great since it had white paint marks and lots of deep gouges, but a light sand and oil would certainly help, right? Ha

What I didn't know was that my solid wood door, was only a slight veneer of wood over a plywood door! I didn't realize that the door would have been so delicate.  Grrr. I exposed the plywood underneath with a slight sanding and now it looked bad right before a visit.  Take a look.
Tools of the crime
Mid Sand where I realized that it was not all wood!
I applied the oil to the door and now you can really see the plywood starting to come through especially down on the bottom left.

Closeup of the Yuckiness

Well, only one solution until I learn how to re-veneer a door!


SOOOOOOOO, I filled the holes, sanded, filled, sanded, and sanded again, and then put on about 5 coats of paint.  I feel it is a bit Kelly Wearstler Palm Springs Modern.  The color is pretty cool, but definitely I want my wood back.  Oh well.  Good for now.  Still love the brass hardware!  Be warned of starting new projects without knowing what you are working with.

Thursday, August 18, 2011

Cookin' up a new Kitchen

The past two weeks have been some hard work.  I have been working on my kitchen and have mashed a few styles together in order to come up with a somewhat compromised look and something that can be a bit more affordable.

The people we bought the house from installed an Ikea kitchen which is just fine, it was just a bit too woody.  Wood for days, fake wood for days actually.  Priority one, break it up.

We went to Ikea and priced out some new doors and it seemed like everything we liked was just out of budget since we have a perfectly good kitchen.  So, the compromise turned out being a partial replacement and a partial painting of the cabinet fronts.  I have been nervous about painting these cabinets since I was unsure how they will hold up.  But, I did ask several expert opinions, especially from the local Benjamin Moore paint store down on 4th Ave South.

With these fakey-laminate wood fronts, I would have to sand them, clean them, prime them twice and then paint them with 3 coats.  A lot of work for sure, but well worth changing the look.  It took a few days of removing the doors and hard ware and then painting, plus a couple of weeks of food on the counters.  Now that it is wrapping up, it is really coming together. Take a look!

Here is the before. It is actually great, but I couldn't handle the colors
 And here is the after.  We are keeping the Teal walls for now, but we may tone them down now that we painted the cabinets.  The Teal was more of a temporary solution to get rid of the pukey light green and ruddy-orange.  You can't say the kitchen isn't happy!

The bottom cabinets are all painted and the upper ones are a bit more complex right now. 

 I really like the colors better than the wood tones that it was before. 
 The shelving above is a new addition at Ikea and I think they are a lot of fun.

So here is something that I need to think about.  They didn't have the cabinets available I wanted (the ones on the left with white glass and aluminum trim) for the sized cabinets on the right.  At least they match colors but Bob and I are still not 100% on the mix yet.  At least I have 90 days to have a second guess on my purchases!


This was a last minute thought on my part to get the Microwave off the counter . I think I need to do something else with this one, but I am going to sit with it for a little while to see if changing it again will help or not.  I really like the exposed beans and grains above and our Soda Stream maker below!


Here is the last quandry right now.  A large closet that has a metal shelf inside for use as a Pantry.  Not efficient, and I think one day it will solve my microwave question.  This will take a bit more thought for now, but for now, it seems like we have an all new kitchen.  :)


Sunday, August 7, 2011

Long Break, but now I am back

So it has been a busy summer.  Work, trip to Italy, getting married, pre-adoption meetings.  Geeze.  Thought I would quickly post my latest project before I catch up with all my recent exploits. 

Bob and I went to Ikea to start planning what we would like to see in both a guest room and our baby room(exciting) and we stumbled on a good thought for our desk!  We put a small desk in our living room so we can put our I-Mac there and watch some TV every once in a while on Hulu.   We have been looking at lots of options for desks and here is what inspired us for awhile and we just weren't sure what to do.

Life Magazine
 So I really liked this one I stumbled on when I Googled Wall Mounted Desks.  I really like this look and it would look great in our mid-century home.  I didn't see anything like this on Ebay, and certainly not in any vintage stores.  I assumed I would have to build this, and I don't think I have the skill set for this quite yet. Ha. The next image I found in the NYTimes.

I will have to go back and check out whose house this is, but I really loved the desk.  There is definitely something to hanging a desk in a public area and then be able to close it off.  I love all the wood and the beautiful hardware that allows the writing surface.  I had a friend give me a quick quote for a simple hanging surface in our living room, but the cost was still around $400 for something quite simple and clean.  Then we stumbled on this at Ikea!


 This is supposed to be for DVD storage, but really! It could be so much more.  I am surprised they dont take it one step further.
The price really made me want to make this work.  It is the same gloss white lacquer that we want to use on our kitchen cabinets when we can afford that step. I googled the Besta Burs to see if anyone had the same idea, and sure enough, Ikea Hacker had already discovered the potential.

So Monday rolled around and here we go.  Of course after I bought the cabinet I realized I had plaster walls, ugh!
So this is the way it looked. Ha.  The old desk will finally be out of here.  I found this in a parking garage for free, so I will probably find a new home for this one. Since we have the plaster, I called our install guys who did a great job on the install!

Now we just need to figure out the cord situation.  One thing at a time for now. :)

Sunday, May 8, 2011

Time for a Picnic

Well, maybe not quite yet ready for Picnics.  We cleaned up the inside of the fence and leveled out some dirt and removed most of the gravel that was embedded in the dirt.  Here are the results.  Our back yard is coming together!  Can't wait for some more summer cookouts!

Still got some touch up to do around the edges, and some plants to buy, but I think it is coming together.  Hope you guys like so far!  Can't wait to plan some more building projects.  If tomorrow is sunny again, I will be outside finishing some more details on the fence! Fingers crossed.

Monday, April 25, 2011

fences part five; pretty much done!

Well, it was a back breaking 3 weekend project but it is pretty much at a stopping point until better weather shows up in Seattle.  The sun will peak for about 30 minutes, long enough for me to peek out the door with a bucket of nails and a pail of stain and then rain clouds roll in.  Such is PacNW existence. Let me know what you guys think!

Somehow, everything fit in a Ford Focus.  It took a few trips, but it was my little pickup!


From the inside of the side yard, turned private yard!  The dimensions changed from the original drawings so that I could punch fewer holes into the concrete.  The way we built it there were only 3 posts that had to be set into the concrete.  The wood is all Western Red Cedar which would have grayed out naturally, but since the last fence was gray and didn't look so sharp, I took the chance in staining.  The stain is a medium brown which matches the eaves of the house.  I need to take some nice pictures of the eaves because they are so beautiful.
 I love that the Japanese Maple is now on this side along with the rocks.  They look great.  Now we are going to work on some of the planting around the fence and restore some grass where you see the gravel in the foreground.
 From across the street.  Really looks great.  The guy walking the dog to the right stopped me to tell me how much he liked the end result.  Honestly, there is more finishing work to do (which is easy to miss from this angle, but I am pretty proud of this).
Still looks good close up! Ha.  If you see to the far right, my neighbor next door also got the bug to build a fence.  He put this fence up last weekend, and it went a lot quicker than mine, but then again, he had a post digger, no concrete and a pretty simple design.  He also had a huge van that come carry all the supplies in one trip.  I went over to introduce myself to him when we were both working on the fence last Sunday but found out he doesn't know any English.  I guess we will communicate with smiling, as he seems nice enough.

Unique Planter

I found this great idea over on Modish Blog for a cool way of making an old filing cabinet work as a planter.  Hmmmmm.  Ultimate recycling project here:
And here is what it could look like, as shown on Design Sponge. This totally looks like a great project for the future.  Wonder how it holds up?!?


Sunday, April 24, 2011

fences part four; first phase

So I tried to reuse the wood from the old fence in my first attempt at building this thing.  That didn't work out so hot.


From the front corner of the lot.  Not so intrusive.

Here is its, obviously with the old wood mixed in and the new wood is pretty in your face.  I took this picture after finishing the planter box. It took me an hour of digging to fill part of the box with dirt and then 12 bags of topsoil.  Crazy big. It is 3' deep in the front and it extends under the fence another foot.  I plan on putting ornamental screening plants in the front and veggies in the back portion.

From across the street. You can really see the mix of the two woods and how that doesn't quite work.  At least I tried to upcycle the wood.  I ended up giving it up to the sweet guy across the street. Can't wait to see what he does with it.

You can see where the fence was as it ran along the edge of the concrete.  The side yard is now pretty huge.  I took this at the end of the day.  This was last weekend.  This weekend I changed out the wood on the fence and added the top 'trellis' and stained it.  I have to get out there tomorrow and finish staining it and then I will take some pictures to share.  I stained it the same color as the wood that covers the eaves.  I need to take pictures of the eaves because that is one of the features that sold us on the house. 
Hopefully more pictures of the 'final' product in the next day or two.  I have plans to add a bit more to the fence in the future but not sure it will be right away.  I got inspired by the James Hotel in NewYork which I saw on Remodelista just recently. Here is a hint at the look I am going for.


I think the pictures above are not exactly what will happen but it has the feeling of what I want. More to come soon. Thanks for reading and thanks for Casey for sharing the cool images attached from the James Hotel!

Saturday, April 23, 2011

fences part three; the design

So, after some debate, here is the basic design we came up with.  We took a bit of all the great design elements from each fence and threw them into a blender and here is what it looks like.

I hope the drawing shows up online since it is sketched on white paper......oh well. Ha. So I didn't want the fence to seem overwhelming in the yard.  I am a big fan of blending in with the neighborhood and not being so closed off.  This fence has some visibility through it and is also the perfect support for growing vines! (Now I need to figure out what plantings work in Seattle)

So I also decided to make the fence into a step forward pattern from the house to minimize it's presense. The front two panels of the fence will be up against the side walk while the rest are firmly in the side yard. Also, along the first three or four panels closest to the house, we have the existing driveway to deal with.  This starts the debate of rip up the concrete, all of it, or do we somehow work with the concrete.  Huge debate with the boyfriend. I don't think either of us feels like it will be too easy ripping everything up and disposing of it. 

The fence as it is drawn takes into account the driveway and all we have to do is punch three holes in the concrete to put posts into the found.  Not too bad (we think!).  Time will tell.  Now it is time to measure more fully, price the materials and fine tune the design!  Not sure my back is going to make it through this one. (In fact, since I writing this post after the fact, I can tell you it actually doesnt make it all the way through in tip top shape.  Meh!)

Wednesday, April 20, 2011

fences part two

So here is what we(probably mostly me) had been thinking.  Obviously, the old fence was pretty bad, off the shelf Home Depot variety, and wasn't holding up very well.  Not only that, but it cut the only chance for a decent yard for us and any future kids happiness in half. We wanted a modern fence but nothing too pretentious or out of place.  Here is a short list of all the contenders that we contemplated.

OK, so this one isn't exactly what anybody had in mind, but if you notice we do have this same patterned concrete block in the back of the house.  Why not carry it on out to the front?  Well, we shot this idea down instantly once we found out that code dictates a permit to lay a concrete foundation for walls.  This was just not a fun prospect since neither of us really wants to learn about permits at this point.


So these three are all awesome. Simple wood choices and some cool designs.  First one was a bit problematic since there was no airiness between the inside and the outside.  We thought since the fence would be almost to the street, it should be airier.  The second one above was just to flimsy looking and the last one was very awesome, but pretty expensive if you looked to price that sucker out.  The more boards you get, the more money, so.....thicker boards are definitely the direction to go.


So these two are our (my) top two choices.  The first one is from design blogger The Brick House's own home and it is pretty much to die for.  Especially the way she carried the fence over and made it a feature on the front porch.  Also love the richness of the wood. Again, it is a bit too closed off, but again they have plenty of a front yard that makes it not seem so severe.

The second fence is a bit closer to home in Leshi, a neighborhood in Seattle. It takes into account hills, which we have plenty of in Seattle, including a slight grade in our own yard.  I reallylike the openness and if you notice there is a second series of slats inside that aide to more privacy without it seeming closed off. Since that would double the amount of wood needed, we definitely would not do this right away.  We could always add that at a later time.

So after looking at all of those, and pics of our house, what do you think would work well?  Let me know your thoughts.  Also, thanks to Hillary, Casey and Quinn for helping out with some ideas at work!! Thanks guys,